Wednesday 30 April 2014

Ye Olde Saucy Gentleman

Once again Deebs was asked to help me practice the male version of a Victorian look. One idea for the music video I've had since is to have the girls dressed as men with devilish goatees and the men dressed as ladies of the night, as the concept of the song is quite tongue-in-cheek and involves questions of sexuality.

This time I put a the wig on Deebs which I had styled previously out of my cheap "old lady" wig. Then I had a good look at him and got an idea of what I wanted to do, took the wig off to apply the basic prep and base makeup and then put it back on to complete the rest of the look so that it would incorporate the wig.


I have to say this was a fun one to do, and quicker than normal I think because I planned it out and gave it some thought before I slapped on the makeup.


Wednesday 23 April 2014

Saucy(ish) Victorian Look


Again, mixing things up since my last post, this idea is pretty much just practice for a music video I will hopefully be doing makeup for. The makeup looks needed have to look Victorian in some way, there is a scene at the end which takes place in a brothel and I thought this was a good place to start! There will also be a scene with a dead person so that might be the next thing I try. The main character is meant to look quite spinster-esque and I already have a couple of ideas for that to try later on...

For now, Victorian sauciness is my attempt.

A couple of pics with and without flash on the camera to try and get the colour across:


I had just bought a lot of new makeup to try out, and I think this shows in how tentative these are. I definitely played it safe with this one and will need to bring it to a new level to really portray a Victorian brothel lady.


Bright lipstick worked well, I previously tried a nude shade but it made me look witchy - not the right tone for me perhaps. I also don't know if this is OTT enough - it's quite subtle and could just be taken as a normal madeup look. Not whoorish enough


The dark lipstick is also good. I reckon I could go WAY more dramatic on the eyes, maybe with real big caterpillar eyebrows and colour/glitter around the temples. I'm not sure how to avoid it looking tarty in an up-to-date sense, thinking maybe Lady Marmalade, Moulin Rouge style might be key. Plus wigs and costumes would help a lot I think.


A bit more colour helps make the look appear more tarty. Perhaps the pink flash on the eyes is more raver than victorian prossey. 


I really should come up with a name for my mannequin head, I feel as if we've been through so much...

Moving forward with Victorian notions, I have tried to style the white wig (as seen previously in my "old lady" look) to make it appear along the lines of Scarlet Pimpernel or an old fashioned horseman. 


This will be one for my lovely model, Deebs to try on in the future I think.


Monday 21 April 2014

Latex Arm Wound (not for fainthearted)

I'd like to repeat that the images below are perhaps not for the faint of heart as they involve creating artificial wounds.


It was surprisingly easy to create something gory looking with the use of liquid latex, toilet paper and a bit of makeup. However, the final result could have been better with some fake blood added, which I may try and learn to make myself in the future.


I first covered my arm in vaseline to help protect the hairs on my skin (I don't know if this actually worked as I managed to wax my arm whilst taking the wound off). Then I added a couple of layers of latex, drying until tacky in between. After that it was a case of building up layers using thin pieces of toilet paper and latex.

The picture above shows what I ended up with before the paint went on. I tried to go for an exposed inner-flesh kind of look, inspired by a tutorial I saw online - will try and find out which website that was.


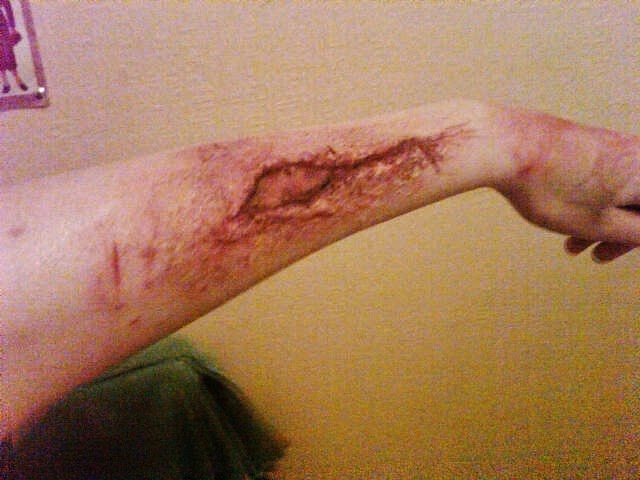
Apologies again for the bad quality of the photograph, but here is an idea of what happened next. I used a mix of normal foundation and greaepaint for the base colour, then darkened with blue/black around the edges to suggest pooling of blood. I also added a bit of bruising and redness around the wound to make it look even sorer.


A lovely close up - the colour doesn't really show up here, and reveals the fact that I need to apply the latex more smoothly next time. However in this case, the bumps give it a bit of a "boil"-y look to it. I have a feeling next time the process will be more successful and more fun with the help of fake blood but for a first attempt I'm quite happy with the results the liquid latex produced.


Monday 7 April 2014

Monsters: Creepy Victorian Porcelain Doll

So while I'm posting unflattering creepy looks, I might as well put up my most recent experiment - the creepy doll look. After the Luchador night I felt it was time to go down a girlier route, although it's certainly not girly in a good way as you will see below.


I tried to be as dead-eyed as possible in these photographs! I think my eyes went a bit squinty in the photos below from looking in the flash too much but it all adds to the freakiness of the look I think. I also incorporated a bit of hair styling this time to round things off. 


I could even make these creepier by adding some gore. I feel I may revisit fake blood/wounds in my next venture.


Monsters: Zombie

This zombie creation was inspired by a youtube video by Rick Baker, legendary special effects makeup guru (who worked on such films as The Exorcist and Men in Black). I will maybe someday create my own original zombie character.

Warning - I look pretty scary in these photos and you may never see me in the same way again. Or maybe it's not that different to my usual appearance.


With/without flash. Neither is much better than the other really. Need to get a proper camera.


Close up of "exposed teeth"

Could add a bit more gore to this - maybe next time I will add some putty and create a few cuts and oozy bits.


With a straggely, greying wig (very cheap I may add). I could add some fake blood next time round the mouth and fake wound. At the moment it's more ghost or frankenstein than zombie.


Sunday 6 April 2014

Lucha Libre 2

My second shot at the Luchador inspired look had a more Mexican feel. I planned it out more carefully this time but the finished effect doesn't come across as particularly original I feel. Still, it's a bit neater than last time and was closer to what I planned to achieve.


After drawing a rough outline in white mixed with a little silver I neatened it up with a forget-me-not kind of colour. Royal blue would have been too much against the red.


Apologies for the aggressive expression - was squinting a bit due to the sunlight. The design was based off the traditional "blue devil" wrestling mask with a bull element. I think I need to get my hands on a costume or props for inspiration and to add to the look of the makeup. 


A particular style of theatre which had been of interest to me is abstract/surreal theatre. Colleagues of mine have recently pointed me in the direction of Theatre of the Absurd, Theatre of Cruelty and In Yer Face theatre (the latter movement came about more recently I think). A particularly surreal production that inspired me was "Les Mamelles de Tiresias" by Macha Makeieff, written by Guillaume Appolinaire. The set design along with costume and makeup create a circus-like world which is constantly transforming and features an unexpected mixture of styles from different times, creating an imaginary by-gone era all by itself. My father played the 'ring leader' of the opera and his costume was out of this world: a bald cap with a few bright blue feathers coming out the top-middle of his head, dark blue glittering eyes - one with clockwork orange style lower eyelashes - and a shimmering blue harlequin suit. I will see if I can get a picture to put up here.

Saturday 5 April 2014

Lucha Libre

One of the many things which has inspired me recently is Mexican wrestling and in particular, the masks traditionally worn by Luchadors. The main aspect which attracts me to this is the colour and boldness which would work well on stage I think. The challenge here was making the look appear mask-like as my first attempts ended up being too tribal. This might have been because I am still mostly making the design up as I go so other influences affect what I'm doing.


My trial here was relatively unsuccessfully in terms of the look I wanted to create - I chose too tribal a pattern and the colours were earthy (brown, yellow and red) so it wasn't bold or detailed enough to give the impression of a wrestling mask. Looking at this picture now, the outline is not strong enough either. It definitely looks better in black and white with a bit of editing.


Again, could improve on outline but it's starting to take shape into a more menacing mask. Added a bit of black to one side to try and make it look like it was on the surface - not sure if it worked or not.


I think I will have another crack at this one - I'd like to incorporate more of a Mexican style into it and plan out exactly what I'm going to do.


Thursday 3 April 2014

Bald Cap in practise


Izzy kindly volunteered to be my first ever bald cap model, perhaps not knowing what she was letting herself in for. After 2-3 hours and a lot of fake hair and latex, we both started to forget what she actually looked like under the makeup. Most of what I did was made up as I went along - the main goal was to apply the bald cap successfully so after that I was just experimenting. 


Izzy on a normal Tuesday afternoon


Izzy last Tuesday afternoon.


The actual bald cap was a little small, or at least the wrong shape. I would make it thicker at the top next time to help hide the shadow of her hair underneath. As you can see at the sides the cap doesn't cover her hair properly - next time I will do my best to make the cap the right size but the head block is perhaps a little too small.


As you can see here I've padded spikiness of the kirby grips using cotton wool. I was hard to keep the cotton in place, plus there were some unpadded areas which didn't rip the bald cap. This type of latex is very transparent so having only certain parts padded shows up. 

I need to be neater with the hair and make the cap much bigger to insure I can trim around the ear properly. You can see in the second photo I've only made-up the front and sides but left the back. I will try braiding the hair next time to make sure its all flattened down, which will allow me to glue it easier at the back.
There are also the lovely ginger sideburns next to a big rip on the bald cap over the temple. Using acetone on the forehead areas melted the edge of the bald cap making it blend in very well but I wasn't happy with the other edges overall.


In conclusion, this was a very enjoyable first attempt with a lot of room for improvement. I would like to get this right before I move on to prosthetics or wigs.

Many thanks to my lovely model, Izzy